A Few Ideas About Removing Dents
From the time that I opened the Mechanics section of my website, I knew that I would eventually be covering the subject of removing dents from brass instruments. I would need to cover all techniques of removing all possible dents from all brass instruments. The seeming impossibility of this task has prevented me from even trying before now and I will have to start with the qualification (disclaimer) that I don't believe that it is possible to be as complete or concise as I would want to be, but I present here some advice on performing the best quality work. While I'm recovering from hand surgery, I am willing to jump in, head first, and do my best to explain what I know.
I don't expect this article to be as useful to the complete novice, other than as entertainment or inspiration to get started and the mechanic that is already producing excellent work may find it redundant. As always, I invite a discussion; please let me know where you think I've gone wrong or am missing something that could be helpful to others. This should benefit you and I and, more so, the reader who sincerely wants to improve the state of art, in his/her own shop or those which they frequent.
I do realize that the state of the art, worldwide, is quite low and I continue to be surprised by the ability of the public to accept low quality work. I am realistic (well, I try to be) about the economics of the situation: most people are not willing to pay the price or travel the distance to get the best that is available and the average repairman is not willing to work as hard as it takes for the relatively low pay involved. But I have to believe that there could be more demand for the service if it were more easily available. Enough said.
The general goal in removing dents from brass instruments is to move the metal back, as close as possible, to where it was before the damage. For work on school instruments, this may not be necessary for the satisfaction of the band director, parent or student, but I think that you will agree that it is the ideal.
The thin brass that instruments are made of has a number of properties including a variety of states of hardness. Trombone slide tubes are close to the maximum hardness and, as such are quite springy. Tuning slide tubes are about 60 to 80% of full hardness, bells and body parts of larger instruments are about half hard and certain parts, such as valve knuckles are dead soft, due to the fact that they are annealed during the silver soldering process and not work hardened thereafter. Work hardening, by processes that compress or stretch the metal, re-arrange the crystal structure of copper alloys, such as brass and nickel silver, making the metal more resistant to those forces. This has to be kept in mind when removing dents from the brass parts in each of these states of hardness.
Dents in tuning slide tubes can never be fully removed, but need to be moved sufficiently to restore the slide action. Stretching the brass to the point where the dent is not seen will increase the likelihood of other problems and, as you can imagine the very springy tubes in a trombone hand slide are the most difficult in this regard. I’ve covered trombone slide repair in a page of its own.
Dents in the half hard parts are less problematic, but you still must keep in mind that they have some ability to spring back after the force is removed, the ability to stretch beyond the original shape if too much force is applied, as well as a small ability to compress. The nature of a dent in a brass instrument wall is, by its nature, almost always a stretching of the metal although can have some compression around the periphery, if on an outside radius. It would be tempting to use some tool to push it the opposite direction until that dent disappears from view, but there will always be some spring back, even after stretching the metal beyond its original diameter.
It must be stressed the the inside of the instrument must be very clean before starting dent work. Any build up of minerals, corrosion or organic matter will prevent the tools to be used efficiently and is typically translated to the exterior surface. Even after normal cleaning, there is sometimes crusty zinc oxidation that will spoil things. A strong ultrasound cleaning may remove it, but may also make holes in tubes with extensive red rod. It is sometimes best to remove this by scraping or with a stiff wire brush.
There are two techniques that minimize the stretching: burnishing and planishing. Both of these involve working the brass between two steel tools, one typically held in a vise and the other in the hands. The stationary part of this system can be an iron, tapered or flared mandrel, cylindrical rod or pipe, or a ball on the end of a rod or cable, as seen in the first two photos below. The hand held tools include straight and curved burnishers, rollers and dent hammers, illustrated in the third and fourth photos.
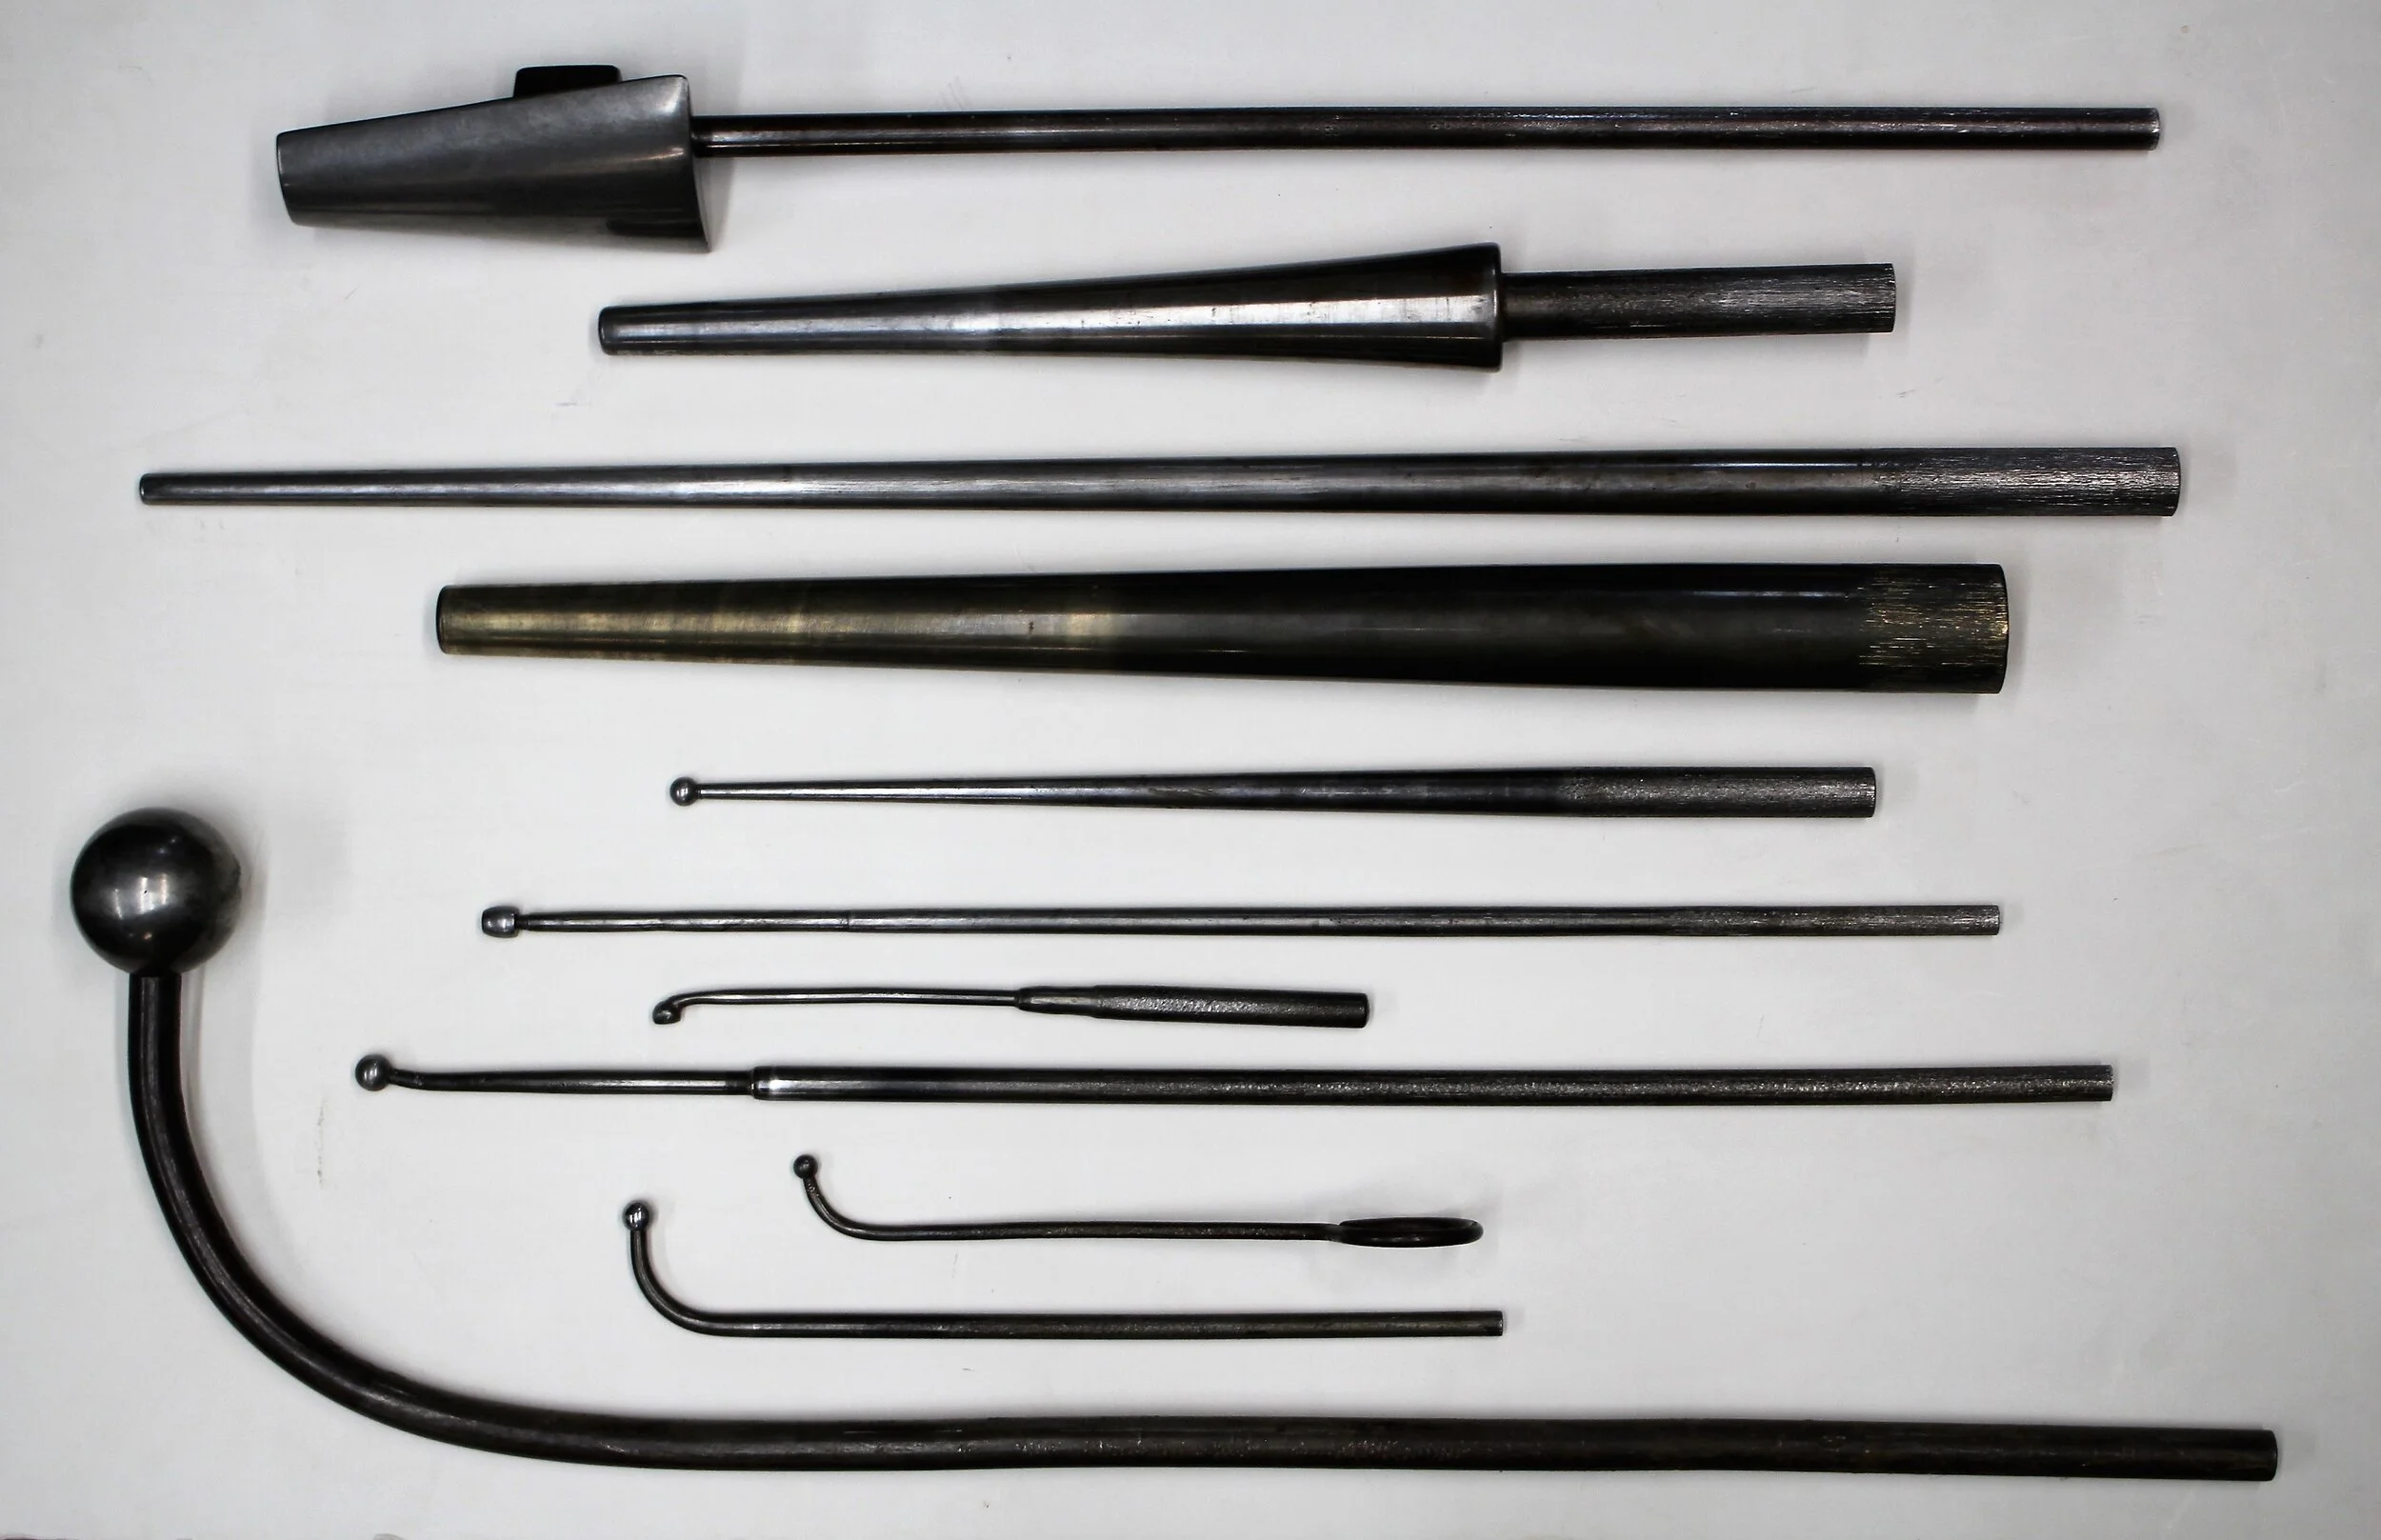
Bell iron, mandrels and rods with ball.

Loose drivers, dent ball cables and dent balls
There are also "dent machines" that hold both tools while the instrument part is moved between them, but I am not covering those here. As well, strong magnets are sometimes used, to pull a steel ball within the tube with similar effect, but with very limited use and typically a much rougher finish. Each tool has its place, and experience will make clear when to use each.
No matter the technique, it is very important to keep the brass securely between the steel tools with little or no airspace. The exception to this rule is when previous repair attempts have caused stretching and you want to attempt to shrink it, at least partially, back where it was. Too much airspace will overcome the springy nature of the brass and will result in deforming the tube. Typically, this is a small matter and is easily smoothed out, but in extreme cases the brass is stretched (or even shrunk). Stretching the brass is the most commonly made mistake, usually in the name of speed, and can't be completely reversed. The best and most complete work can be done with the part removed from the instrument, with all braces, guards etc. removed. However, most of our work is done without disassembly and with care and forethought, excellent work can still be done.
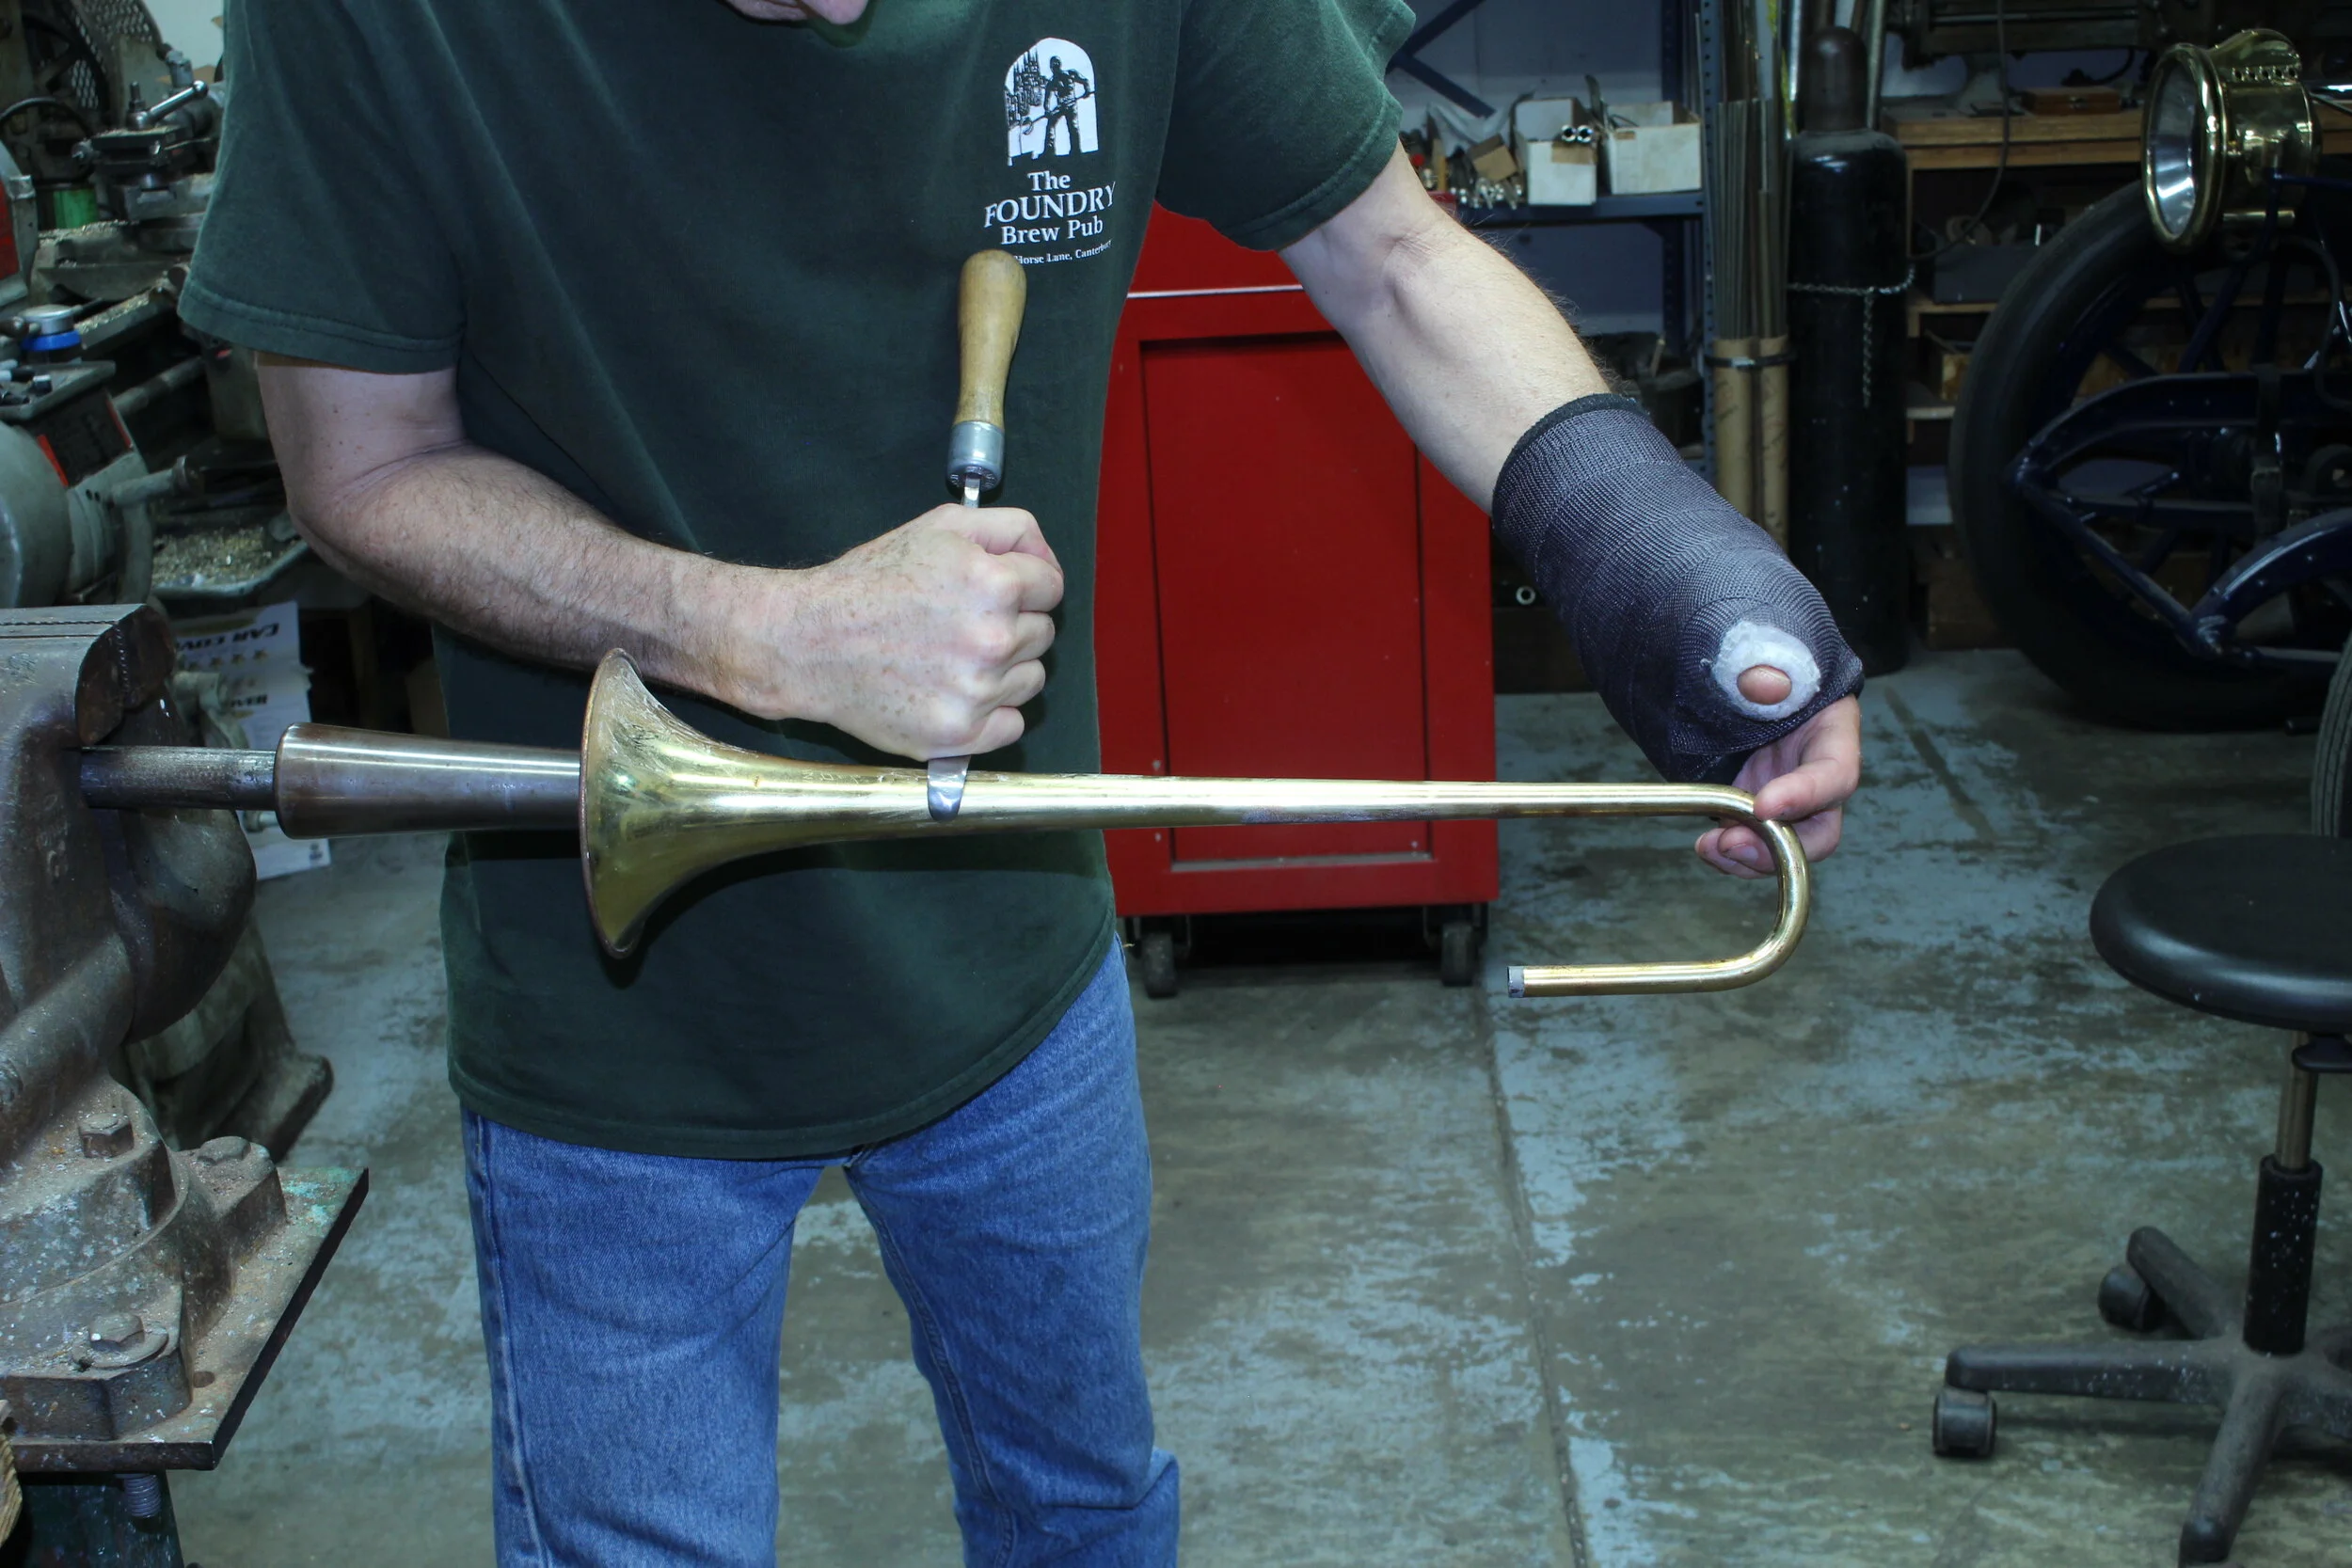
The photos show typical postures for burnishing bell dents. The hands must be trained to work in unison in order to keep the brass in contact with the iron or mandrel directly under the burnishing tool or roller. Bending at the knees and hips will allow the body to easily follow the movements of the hands and arms, while concentrating the force on the work.

Burnishing a trumpet bell with a curved burnishing tool.
Three or four hands would be convenient sometimes, but there is always a way to get the work done well. Hanging the back end of the burnishing tool or roller on a sling over the shoulder, while it is being steadied with the upper arm, will relieve some of the strain on the joints, tendons etc. A wooden handle is usually installed on the tang of the burnishing tool. Choose or make a handle that it long enough to hang on the shoulder sling comfortably.

Rollers and burnishing tools.
When the damage is more than just very small dents it is best to start by other means of moving the metal to the point where it can be burnished. The bent bell rim is best moved using a rawhide mallet with blows the opposite direction of the damage. This can be done on a bell flare mandrel, but most of the time, I prefer to place the bell flare on my knee while seated.

Roughly straightening the rim before burnishing.
Then, a large part of the crease in the flare can be pushed back using a roller, mounted in a vice. Take great care in this step and resist the temptation to use too much force in an attempt to remove the entire crease. Especially with thin, lightweight bells, the metal is easily stretched and can never be completely repaired after this mistake.

Carefully moving the largest creases before burnishing.
Keep all your dent tools polished and free of oxidation. When working on an instrument on which the finish is in good condition, be sure to polish your burnishing tools immediately before doing the work (Tripoli works fine). Even a microscopic amount of rust will cause a great amount of scratching of the surface. Spread lubrication on the surface to be burnished. I have found the best lubrication for burnishing to be Ivory bar soap, although there are other products that are preferred by others.

Burnishing trombone flare with curved tool.
My favorite burnishing tool for bell flares comes to a sharp point, enabling me to burnish right up to the bell rim, but without great care, that sharp tip will cause a deep scratch in the metal.

Burnishing the flare up to the rim.
A large amount of force may be needed on the burnishing tool at first, especially on thicker metal, but I follow up with lighter strokes to smooth the heavier burnishing marks.

Heavy force with roller that will be followed by burnishing.
After the flare is burnished to my satisfaction, I turn the bell over and, with relatively light strokes of the burnishing tool, smooth the marks that were previously made while removing the dents, watching the progress inside the flare.

Additional smoothing a trumpet flare after burnishing.
The last step is to use the roller mounted in a vise to do some final reshaping of the flare, using only enough force that will shape it without stretching the metal. Gauge your progress with your hands and fingertips.

Final smoothing/shaping of flare.
Check the flatness of the bell rim on a flat surface and if needed, use light blows of a rawhide mallet to the high point while it extends off the benchtop, as seen in the photo.

Straightening the bell rim.
Removing dents from straight, tapered tubes, such as bell tapers, are the easiest to do well. If the damage is deep, it is important to push a large portion of the dents up first, using the rounded end of the tapered mandrel or a ball on the end of a rod. This must be done using great care not to stretch the brass. Then straighten the tube so that it will make contact with the mandrel as you burnish. In rough work, a curved roller can be used to smooth the metal.

Burnishing taper with concave roller.
Better control and finer work will be done with curved or hooked burnishing tools (freshly polished if on a good finish) with lubrication. As with the bell flare, great force may be needed initially, but follow up with lighter pressure to smooth and round out the tube.
Using hooked burnishing tool.
The above burnishing techniques work best up to about 1/2" to 1" from the curve of the bell or branch, but then another group of tools and skills are needed. A ball on the end of a straight or curved rod will reach at least part way into the curve. Always use the largest ball that will fit without much force. Barrel shaped dent balls are best for the straight length of the tube, but once reaching into the curve with a ball on the end of a rod, a round ball must be used. For the same reason, always use dent hammers with the largest radius that is practical, which reduces sharpness of each hammer blow.

Dent hammers.

Planishing near the bell curve.
As above, push the deepest part of the damage up, using only enough force that will not stretch the metal. Then planishing technique will come into play. Planishing involves many light hammer blows to the brass tube wall supported by the ball inside, using only enough force to slowly reshape the metal and keep the ball moving across and around the area. In addition, it is sometimes necessary to use heavier blows to a sharp crease, again supported by the ball, as well blows to high spots while the ball is being pushed against adjacent low spots. Planishing serves the same purpose as burnishing or rolling, gently reshaping the tube, as much as possible, back to its original shape. As in burnishing, if heavy blows are necessary, they are followed by lighter blows to smooth the metal.

Planishing with loose ball on cable.
I got a request from a Colin Sanders, young repairman in Chandler, AZ to show planishing in a video. I was reluctant, but it came out all right and he said that it was helpful. You can view that video by clicking here.
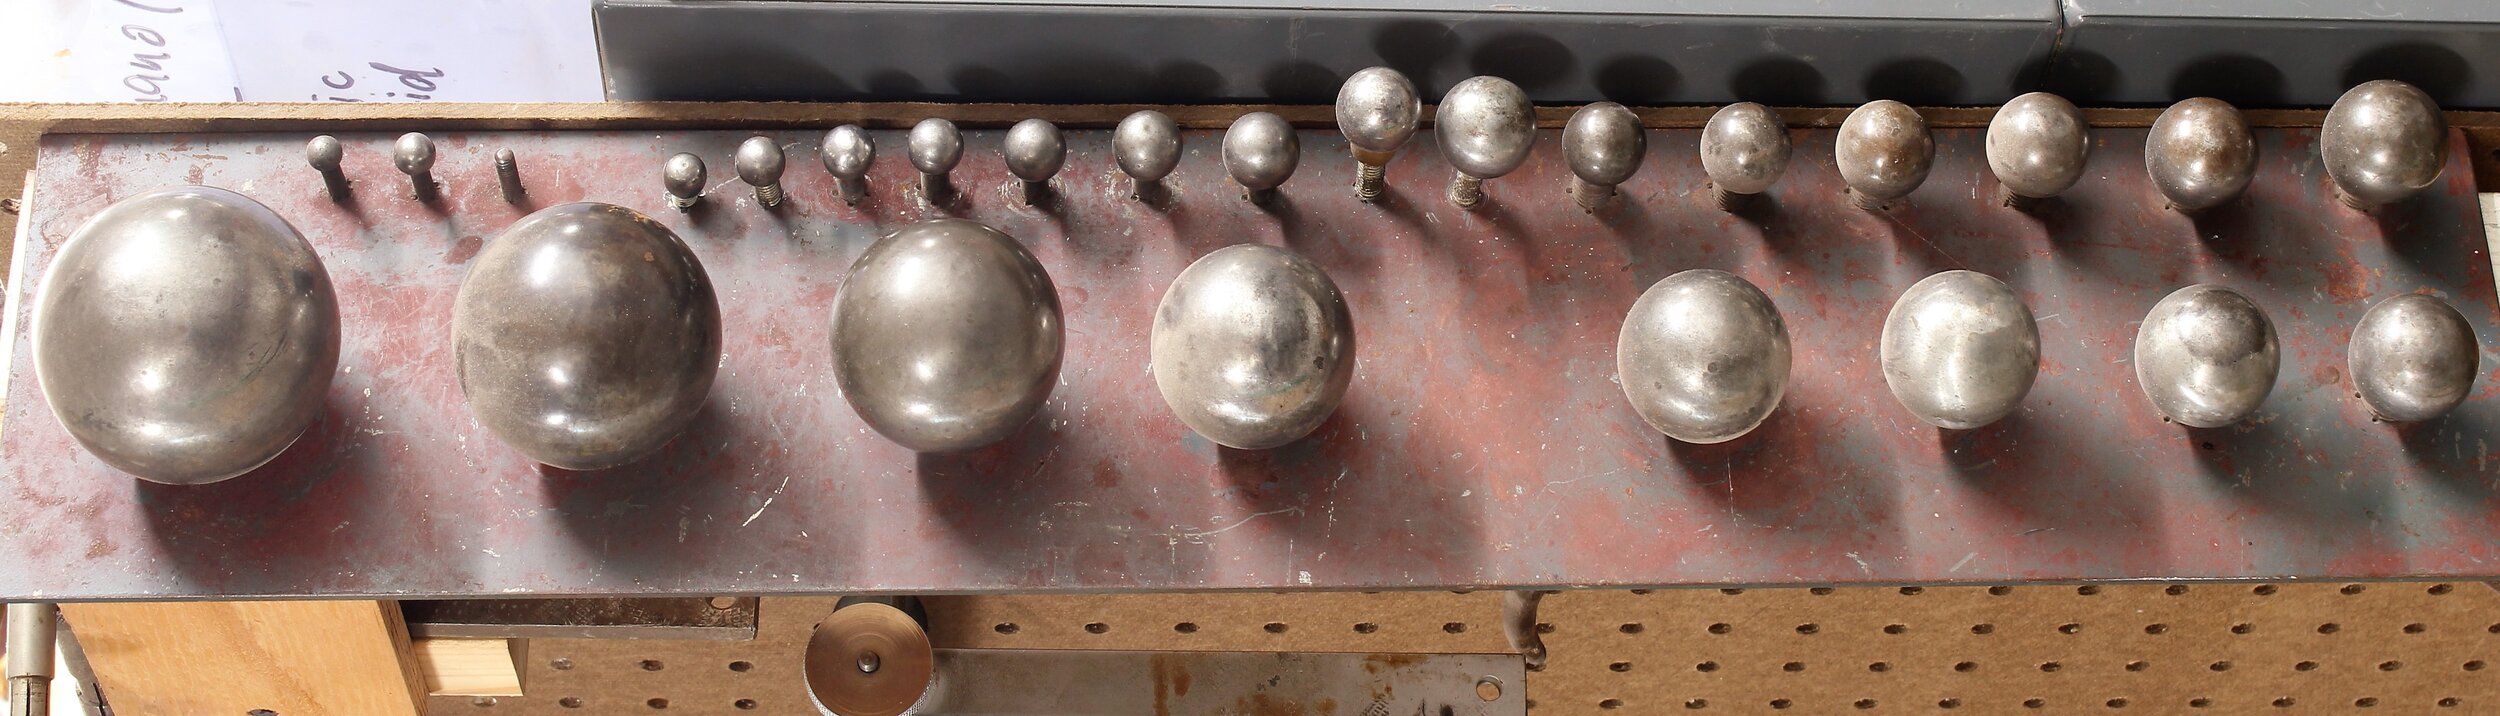
Where the previous balls on rods will not reach, dents will have to be removed using loose balls, controlled by a cable or drivers. I show the use of cables, but the use of loose drivers is mostly the same and should always be held in reserve and is occasionally needed, no matter how well equipped the shop is. These dent balls should be a set that are barrel shaped in graduation of .005" (preferably .0025" for the smaller sizes).

Dent balls from 1/4” to 3”.
Dent balls that thread onto rod ends.
There are a variety of good quality cable systems available for controlling dent balls and typically use a 1/16" flexible cable that is partially covered with plastic balls or segments and a thick wall steel tube for holding in the hand or vice. The plastic balls are close to the steel dent ball to help reduce the risk of wrenching the former sideways, which would cause major damage to the tube. I always use a spacer between the dent ball and the driving ball. This makes the work much easier and the cable last far longer. The amount of slack is intended for work on lower quality instruments by hammering balls into the tubing and stretching the metal. I realize that this sort of work may seem like providing good value to the customer and more profit for the shop, but my advice to the mechanic is to practice good work even when it doesn't matter so that you will have the skill when it does.
I've installed magnets in the handles of my favorite dent hammers, opposite the heads, to easily locate the ball. Always start with a dent ball that is just large enough to start pushing up the largest dents or that will go all the way to the smallest area with dents to remove. Starting out with too large a ball for the purpose of pushing out a deep dent will cause a bulge in the opposite side of the tube, damage that can never be completely removed. As well, never force the ball into the tube with enough force to stretch the tube for the same reason.
While easing up the deepest dents, carefully tap the high spots while the ball is being pushed past the adjacent low spots. Avoid the temptation to skip too many ball sizes for purpose of speed, especially in thin walled instrument parts. Never hammer too many blows on a stationary ball, which will also cause a bulge. Keep the ball moving back and forth through the area being planished and when smoothed to your satisfaction, move to the next larger ball. The best planishing is done with the ball just slightly loose in the bore, relying on the springy nature of the brass to keep the tube section round. Never force the ball into a tube that is a smaller diameter, which will cause a bulge. I know that I am repeating myself, but this is an area where high quality instruments are reduced in quality far too often. Don't be afraid to go back to a smaller diameter ball, if the area is not smoothed to your satisfaction.
Also keep in mind that it is possible to shrink the tubing diameter, by only hammering adjacent to the dent ball. While this is a far less common problem, it should be considered.
Too often, incomplete or sloppy dent work is followed by filing and/or sanding the surface smooth and heavy polishing in an effort to hide the evidence. Not only will this reduce the overall quality of a musical instrument, but will reduce its usable "life span" and if ever in the hands of a careful mechanic in the future, he/she will curse you and your attempts. A very light polishing will reduce the intensity of the tool marks, but never be afraid to leave the fine tool marks resulting from careful, high quality work.
While it is most often desirable to remove dents without removing the part from the instrument, keep in mind that it is often impossible to do the highest quality work without doing so. In these cases the owner of the instrument should be informed of the choices and price and time differential.
In high quality, hand made instruments, the tubing around the curves may have sections that are made oval from the bending process. It may be impossible to force a dent ball through these sections without stretching the metal. This situation is made more pronounced by multiple overlapping dents in the outside radius of the curves.
A popular technique, that I was taught while in my 'teens, is to solder a rod or bar across the straight legs of the curve before removing those dents. In my experience, however, the amount of force needed to remove the dents while braced in this way causes more distortion of the bore than by letting the curve open up as the tubing is made round again. If this is effect is very minor, I will very carefully bend it back to its original shape, recreating the original oval sections, before mounting it back on the instrument. If the effect is any more pronounced, I will fill the curve with pitch or Cerrobend and then reshape it, paying careful attention to how it will fit back on the instrument. Most often this is done without annealing the area, but in more extreme cases, it would be prudent to do so.
It is possible to get the straight portions of the tubing perfectly parallel and still not be able to mount it back in its original position. It is so common to see old cornets and trumpets with the bells sloping downwards, that I have experienced several people trying to convince me that this is how they were produced when new. I won't buy it and neither should you.
While the small crooks, such as those in valve slides are almost always made in ways resulting in complete roundness in section, they are easily made oval from multiple overlapping dents followed by too much hammering on the high spots (shrinking). More force is typically needed in these cases to push the low spots up before and during the planishing process. Keep in mind that, by their nature, the outside radius of these crooks has the thinnest walls, having been stretched severely and then sanded smooth during manufacture, as well as most often dented. Multiple cycles of damage and repair, along with deterioration by de-zincing or "red-rot", as it is often called, results in weak and brittle metal that easily cracks, whether expected or not.
You will often see the inside radii of small crooks smashed in by the use of slide pulling tools that can only be properly described as instruments of torture. These tools are intended for situations when it is believed that good work is not necessary and is another sort of damage that can never be repaired. It is best to replace these crook, but it would be better yet to avoid this damage.
Dents in wider crooks such as in a tuning slide, where they can't be reached using a curved rod and ball, can be partially (usually 80% to 90%) using a loose ball on a cable and planishing. For the most complete dent removal, one or both of the slide tubes will need to be removed to reach in with a longer curved rod.
The valve knuckles that attach the casings to the slide tubes begin dead soft as a result of having been silver soldered in place and so are easily stretched by unskilled dent removal. Indeed, removing dents from annealed brass is almost impossible to accomplish without altering the bore dimension, both stretching and shrinking. Keep this in mind and avoid stretching the brass when pushing up the deep dent and understand that the metal is hardened a bit as soon as it is dented and more so when you apply force to remove the dent. The surrounding brass is still very soft and your goal is to regain the original shape with this impossible situation. It would be wise to keep this in mind when your customer requests that you anneal his bell, mouthpipe or any other part of his instrument.
It is a very silly idea that the modified crystalline structure of the brass will perceptibly change the acoustics of the air column, but it would be more productive to scream into outer space than argue this point. Only do so if you feel very confident of your financial situation.
Using seemingly infinite variations of the ideas that I presented above have allowed me to satisfy some of the fussiest customers over the last 40 years and I hope that they inform you in some way. As I state on several other pages on this website, we are all free to pursue our goals, whether it is to produce the largest number of widgets of acceptable quality or to learn and preserve what is good and true in our world. Most important is to always do what is ultimately good for you and your fellows.
If you are in the business or otherwise interested in the subject of repairing brass instruments, you have probably viewed a number of videos on the subject. This is a very important way of viewing the world these days, but keep in mind that every presentation has its weaknesses (including this page). With healthy applications of the facilities that you were born with ("use your common sense!" as my dad used to yell), you will be able to determine not just what will satisfy your customer in the moment, but what will result in the knowledge that you have done your best.
Now, get back to work.